| Templates used: | |
| Release checklists: |
This tutorial covers the steps required to add SaaS integration table schema documentation.
Note: This tutorial will work only if the integration’s schema files (located in its Singer GitHub repo) are valid JSON objects.
Step 1: Create a new branch
If you haven’t already, create a new branch off of the Stitch Docs master branch. Name it something descriptive to ensure it’s easy to find and tell what you’re working on.
Note: Do not fork the Stitch Docs repo and create a branch. Please clone the repo locally, and then create a new branch.
Step 2: Run the schema script
Follow the instructions in the Generate SaaS integration schema files guide.
Step 3: Define the table's attributes
For each table schema file output by the script, you’ll need to do the following:
Step 3.1: Define the table's Primary Keys
In the table’s attributes list, define the table’s Primary and Replication Keys (if applicable).
attributes, followed by Replication Keys, regardless of alphabetization. This ensures that they will display at the beginning of the table in the rendered documentation. If these attributes aren’t listed first, they will break the template used to display the content.
To declare an attribute as a Primary Key, add primary-key: true to the attribute.
attributes:
  - name: "id"
    type: "string"
    primary-key: true       ## Primary Key
    description: "The customer ID."
More than one attribute can be declared as part of a table’s composite Primary Key. For every attribute that is part of the Primary Key, add primary-key: true to the attribute:
attributes:
  - name: "id"
    type: "string"
    primary-key: true       ## Primary Key
    description: "The customer ID."

  - name: "date"
    type: "date-time"
    primary-key: true       ## Also a Primary Key
    description: "The time the customer was added to the list."
Step 3.2: Define a Replication Key
The instructions for declaring a Replication Key for a table depend on how the Replication Key works for the table:
- The Replication Key is an attribute that will be in the destination table after loading, or
- The Replication Key is a query/path parameter used in the API request
If the Replication Key is a destination attribute
attributes.
If the Replication Key is an attribute that will be in the destination table after loading, you can declare it by adding replication-key: true to the attribute:
attributes:
  - name: "id"
    type: "string"
    primary-key: true
    description: "The customer ID."

  - name: "updated_at"
    type: "string"
    replication-key: true       ## Replication Key
    description: "The time the customer was last updated."
If the Replication Key is a path/query parameter
If the Replication Key is a query parameter used in the API request, you can declare it by defining it in the top-level replication-key attribute. Note: This will not be present in the attributes list, but instead below the table’s replication-method:
---
tap: "integration_name"
# version:

[...]

replication-method: "Key-based Incremental"

replication-key:
  name: "updated_at"

attributes:
  [...]
Step 3.3: Declare Foreign Keys
A foreign key is a column (or series of columns) in a table that can be used to uniquely identify a row in another table. You can create a list of references for an attribute by adding an additional key to the attribute:
- name: "CurrencyCode"
  type: "string"
  primary-key: true
  description: "**For bank accounts only**. The currency code the account uses.."
  foreign-key-id: "currency-code"
Which will output something like this:
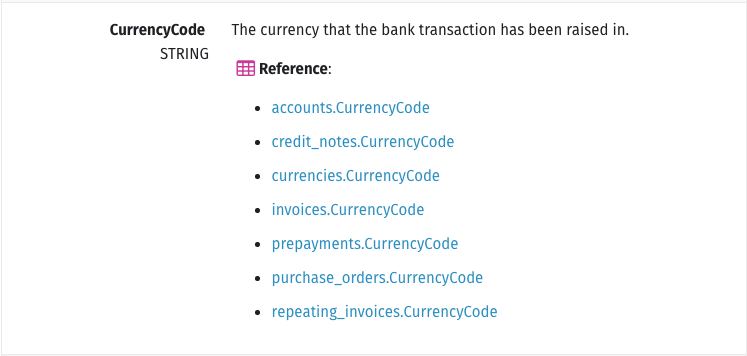
Use the following resources as a guide for adding foreign keys to table schema files:
Step 3.4: Add attribute descriptions
For each attribute in the attributes list, add a description that explains what the attribute is. This can be written in Markdown or HTML.
In general, you can use the same descriptions that the integration’s API docs use. Edit for grammar and clarity where needed.
Refer to the SaaS integration table schema template reference for examples.
Step 3.5: Save and repeat
Repeat the steps above for each file generated by the script.
Step 4: Refer to your release checklist
If you’re working on a release, refer to the release checklist you’re using to wrap up the remaining steps for launch:
Back to top
Last updated: 28 July 2021