| Templates used: | |
| Release checklists: |
This tutorial covers the steps required to add foreign keys to SaaS integration table schema documentation.
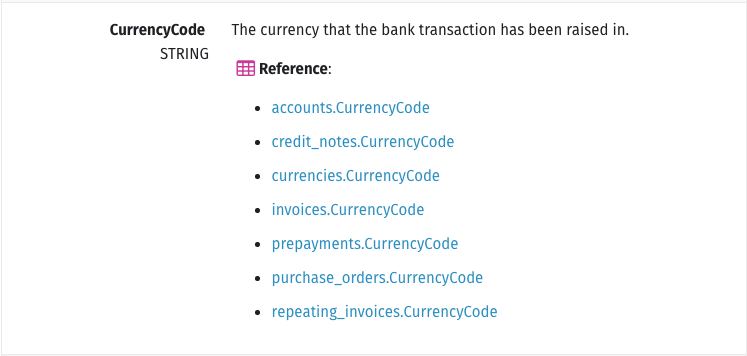
When foreign keys are added to integration schema documentation, a list of references will display beneath the attribute and link to the referenced tables. Below is an example from the Xero documentation:
Step 1: Check for an existing foreign keys file
-
In the
_integration-schemasfolder, navigate to the subfolder for the integration and version you’re working on.For example: If you were working on version 1 of Zendesk, you’d navigate to:
_integration-schemas/zendesk/v1 -
If there’s a
foreign-keys.mdfile in the folder, move on to Step 3.
Step 2: Create the foreign keys file
foreign-keys.md file in the integration + version’s folder in _integration-schemas.
Step 2.1: Save a copy of the foreign keys template
- Locate the foreign key file template, located at
_templates/integrations/saas-foreign-keys.md - Save a copy of the template into the integration’s schema folder in
_integration-schemas, naming itforeign-keys.md.
For example: For Zendesk v1, the file location would be: _integration-schemas/zendesk/v1/foreign-keys.md
Step 2.2: Fill in the integration details
-
In the
foreign-keys.mdfile you created in the previous step, enter the integration’snameinto thetap-referencefield.For example: If you were working on
Zendesk, you’d enterzendesk. -
In the
versionfield, enter the version of the integration you’re working on.For example: If you were working on version 1, you’d enter
1.
Below is an example of how this might look for Zendesk v1:
---
tap-reference: "zendesk"

version: "1"

[...]
---
Step 3: Create foreign key references
There are two steps to creating a foreign key in an integration’s schema documentation:
- In the table schema file: Adding a
foreign-key-idto an attribute - In the foreign keys file: Adding an attribute to the
foreign-keysobject
Step 3.1: In table schema files
To declare a table attribute as a foreign key, add the foreign-key-id field to the attribute.
The value of foreign-key-id is a unique, lowercase ID that describes what the attribute is. For example: The id attribute below is for an user table, making it an agent ID.
So, in this case, we could have the foreign-key-id be user-id:
---
name: "users"

attributes:
  - name: "id"
    type: "string"
    primary-key: true
    description: "The user ID."
    foreign-key-id: "user-id"

[...]
---
In every table where this attribute appears, add the foreign-key-id to the appropriate attribute.
For example: In a tickets table, there’s a column that contains the user’s ID (user_id). By adding the foreign-key-id to tickets.user_id, we can declare the attribute to be a foreign key:
---
name: "tickets"

attributes:
  - name: "id"
    type: "string"
    primary-key: true
    description: "The ticket ID."

  - name: "user_id"
    type: "string"
    description: "The ID of the user who created the ticket."
    foreign-key-id: "user-id"

[...]
---
Step 3.2: In the foreign key file
For every attribute you declare as a foreign key in a table schema file, there must be an entry in the integration schema’s foreign-keys.md file.
-
In the
foreign-keys.mdfile, locate theforeign-keyslist:--- tap-reference: "zendesk" version: "1" foreign-keys: # <-- this [...] --- -
Using the template, create an entry for the foreign key:
--- tap-reference: "zendesk" version: "1" foreign-keys: - id: "user-id" # foreign key id table: "users" # name of parent table, if applicable attribute: "user_id" # the most common name for the attribute all-foreign-keys: # list of tables that contain the key - table: "" join-on: "" - table: "" --- -
In the entry’s
all-foreign-keyslist, you’ll add the names of the tables where the key appears. This list should include the parent table, if there is one:--- tap-reference: "zendesk" version: "1" foreign-keys: - id: "user-id" table: "users" attribute: "user_id" all-foreign-keys: - table: "tickets" - table: "users" # name of the table with the key join-on: "id" # name of the key in that table ---Note: The
join-onfield only needs to be included if the name of the key in a specific table is different than theattributevalue. In the above example, theall-foreign-keysentry forusershas thejoin-onfield. This is because in theuserstable, the key isidand notuser_id. -
If the key exists in an array or object, you can add a
subattributefield to theall-foreign-keysentry. Using dot notation, list the path that leads to the subattribute containing the key field.For example:
---
tap-reference: "zendesk"

version: "1"

foreign-keys:
  - id: "user-id"
    table: "users"
    attribute: "user_id"
    all-foreign-keys:
      - table: "tickets"
      - table: "tickets"               # name of the top-level table
        subattribute: "collaborators"  # name of the subattribute(s) with the key
        join-on: "id"                  # name of the key in the subattribute
      - table: "tickets"
        subattribute: "collaborators.agents"
        join-on: "id"
      - table: "users"
        join-on: "id"
---
In the rendered documentation, this would produce a list of foreign keys like the following:
- tickets.user_id
- tickets.collaborators.id
- tickets.collaborators.agents.id
- users.id
Step 4: Refer to your release checklist
If you’re working on a release, refer to the release checklist you’re using to wrap up the remaining steps for launch:
Back to top
Last updated: 28 July 2021