| Templates used: | |
| Release checklists: |
This tutorial covers the steps required to add a new version to existing integration or destination documentation.
Note: From this point forward, connection will be used to refer to an integration or destination.
If a connection has multiple versions, a menu with all of the versions for that connection will display in the top-right corner of the page:
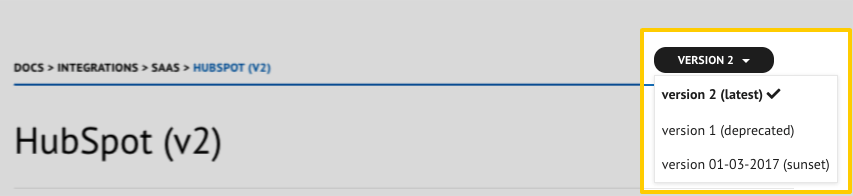
This allows users to toggle between versions and selet the one they want to view.
Step 1: Create a new branch
If you haven’t already, create a new branch off of the Stitch Docs master branch. Name it something descriptive to ensure it’s easy to find and tell what you’re working on.
Note: Do not fork the Stitch Docs repo and create a branch. Please clone the repo locally, and then create a new branch.
Step 2: Locate the connection's version file
Every connection has a data file that contains info about each of its versions. This controls the display of content in the docs and allows users to toggle between versions.
- For a brand new connection, you may need to create a version file. See Step 3.
- For an existing connection, you’ll need to update the version file. See Step 4.
Step 3: Create the version file
- Locate the connection version file template, located in
_templates/common. - Save a copy of the template into the correct data file location for the connection:
-
For integrations, save the template in
_data/taps/versions. The file name should follow this naming convention:<integration-name.yml>.For example: If the integration is Facebook Ads, the file name would be
facebook-ads.yml. The full location of this file would be_data/taps/versions/facebook-ads.yml -
For destinations, save the template in
_data/destinations/<destination-type>, where<destination-type>is the type (or name) of the destination. The file name should beversions.yml.For example: If the destination is PostgreSQL, the full location of this file would be
_data/destinations/postgres/versions.yml
-
Step 4: Define the latest version
In the connection’s version file is a parameter named latest-version. The value of this field is the ID of the latest version and should reflect the latest major version of the connection.
For example: If the latest version is 1:
latest-version: "1"
Step 5: Update the released-versions list
In the connection’s version file is a list named released-versions. This list contains all versions for a specific connection, including their status, release, deprecation, and sunset dates.
For every version of a connection, a corresponding entry should be created in this list. For example: This is the version file for the HubSpot integration:
# -------------------------- #
#     HUBSPOT VERSIONS       #
# -------------------------- #

latest-version: "2"

released-versions:
  - number: "2"
    status: "released"
    date-released: "May 30, 2018"
    # date-last-connection:
    deprecation-date: ""
    sunset-date: ""

  - number: "1"
    status: "deprecated"
    date-released: "August 22, 2017"
    date-last-connection: "May 29, 2018"
    deprecation-date: "September 1, 2018"
    sunset-date: "September 23, 2019"

  - number: "01-03-2017"
    status: "sunset"
    date-released: "March 1, 2017"
    date-last-connection: "August 21, 2017"
    deprecation-date: "November 22, 2017"
    sunset-date: "November 22, 2017"
To fill in the details, refer to the Integration/destination version template reference.
Step 6: Refer to your release checklist
If you’re working on a release, refer to the release checklist you’re using to wrap up the remaining steps for launch:
- New SaaS integration release checklist
- New SaaS version release checklist
- New destination release checklist
- All release checklists
Back to top
Last updated: 28 July 2021